XML Signature Generation and Validation
You must complete the following general steps in order to configure the SAML system to generate digital signatures:
- A signing key pair (SKP) must be generated or imported into the system and stored in eDirectoryTM.
- The SKP must be exported from eDirectory in PKCS#12 format and stored on the SAML extension server.
- The appropriate settings must be set on the Trusted Affiliate object whose SAML data you want to sign.
- The public key certificate associated with the SKP must be exported and sent the Trusted Affiliate that will be validating the signatures you generate.
Creating a Signing Key Pair
There are a number of ways to get a key pair into an eDirectory system:
- Use Novell® Certificate ServerTM to generate the key pair and certificate, signed by your Tree CA
- Use Novell Certificate Server to generate the key pair and certificate signing request to be signed by an external CA
- Use Novell Certificate Server to import an external key pair stored in PKCS#12 format
The following instructions show how to generate a key pair using Novell Certificate Server and the Novell Certificate Server snap-ins. For more detailed information on key and certificate management, Novell Certificate Server 2.7.x Administration Guide.
-
Create a NDSPKI:Key Material object.
This is the what the Novell Certificate Server calls a public / private Key Pair object. Novell Certificate Server stores and associates Key Pair objects with servers, so you must create the Key Material object in the same container as the server you want to use to host the key. For these purposes, the server you choose to use is immaterial. Figure 60 shows how a Key Material object is created:
Figure 60
Creating the Key Material Object
-
Select the Key Material object, then click OK.
A wizard is launched to guide you through thee certificate generation process, as shown in Figure 61.
Figure 61
Certificate Generation Wizard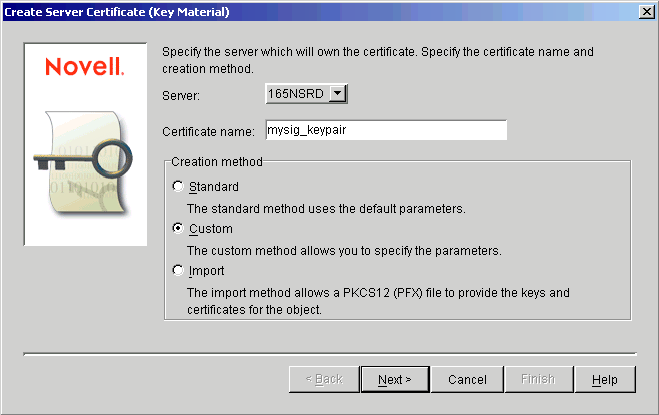
-
Select the server where you want to create the private key.
The Creation Method selection determines what type of operation you are going to perform.
-
If you already have a certificate you want to use, select Import. Otherwise, select Custom.
If you choose the Import option, you are prompted to enter the file name and password associated with the PKCS#12 file you want to import. (This is a relatively straightforward operation; see the Novell Certificate Server documentation for details on importing external certificates.)
-
Click Next.
-
You are prompted about whether you want to create a public key certificate signed by your Tree's Certificate Authority (CA) or an external CA, as shown in Figure 62:
Figure 62
Specify the CA
Typically, if you are creating a certificate for testing, you can use your built-in Organizational Certificate Authority. For production, you will probably want a certificate signed by a well-known CA, such as Verisign* or Entrust*. If you want to select an external CA, select External Certificate Authority.
-
Click Next.
-
Define the key pair properties. Bacause this certificate is to be used to sign SAML data, make sure Signature is selected, as shown in Figure 63:
Figure 63
Define Key Pair Properties
Typically, a key size of 2048 bits is sufficient.
-
Click Next.
-
Define additional key and certificate properties.
Make sure you create a subject name that allows your partner sites to identify the certificate as yours. A general rule is to make the subject name the same as your Site ID. In this example, a certificate is being generated for the iChainSite sample site, so the Subject name is .CN=www.ichainsite.com. Subject names in the Novell Certificate Server must begin with a period (.) character, as shown in Figure 64:
Figure 64
Define Additional Key and Certificate Properties
-
Click Next.
-
Finish this operation: If you are signing the certificate with your Tree CA (Organizational), you are prompted to select either Your Organization's Certificate or the Novell Root Certificate's certificate that will sign your certificate.
Figure 65
Specify the Trusted Root Certificate
Either certificate works for testing purposes. For information about the differences between the two, refer to the Novell Certificate Server 2.7.x Administration Guide.
-
Click Next.
You are presented with a summary page that outlines all of the selections you made using the wizard. Verify that your selections are correct, then click Finish.
Figure 66
Summary of Your Selections
The key pair is generated.
You should see a new NDSPKI: Key Material object in the directory. The name of this new object is the name you specified in the wizard, followed by the hosting server name. Figure 67 shows the key pair generated in this example. The certificate name is mysig_keypair - Dutton.
Figure 67
Key Pair
You can associate your SAML configuration object with the key pair you just created. Although this is not required, we recommend it because it keeps the association between the key pair you generated and the SAML configuration.
-
To create this association, right-click the SAML configuration object, then click Properties, as shown in Figure 68:
Figure 68
SAML Configuration Object: Properties
If you create this association, when you are working with the configuration of the SAML system, you now have a link back to the key pair you're using to sign SAML data, as shown in Figure 69:
Figure 69
Key Pair Link
-
Continue with Exporting a Signing Key Pair.
Exporting a Signing Key Pair
You must now export the key pair you just created to a disk to store on the SAML extension server:
-
In ConsoleOne, double-click or right-click the Key Pair object, then select Properties.
The key pair's Properties page is displayed, as shown in Figure 70:
Figure 70
Key Pair Properties
-
Click the Certificates page.
-
Select Public Key on the drop-down menu.
A Properties page is displayed, as shown in Figure 71:
Figure 71
Public Key Properties
-
Verify that the subject name, effective date, and expiration date match the values you entered during the certificate creation process.
-
Click Export.
This exports the key pair. A wizard page is displayed, as shown in Figure 72:
Figure 72
Key Pair Export Wizard
If you want to export only the public key certificate, select No. In this example, because you are exporting the public - private key pair, Yes is selected.
Selecting Yes exports the public and private keys in password-protected PKCS#12 format. This is what you must move to the SAML extension server.
Selecting No exports the public key only. This is what you must provide to your partner sites later.
-
Select Next. The Export Certificate Wizard is displayed, as shown in Figure 73:
Figure 73
Export Certificate Wizard
-
Specify a filename and password.
The filename can be whatever you desire. Take note of the password you enter. It is required later as part of the SAML extension server setup.
-
Click Next.
Continue with Setting the PKCS#12 Signature Key on the SAML Extension Server for information on importing the file into the SAML extension server.
Setting the PKCS#12 Signature Key on the SAML Extension Server
To import the Signature Key file into the SAML extension server:
-
Copy the PKCS#12 file exported in the previous process to the local drive of the SAML extension server.
-
Modify the SAML extension server configuration file to point to the PKCS#12 file.
-
Restart Tomcat.
When you installed SAML extension, a configuration file was automatically generated. This file is located at samlext_home/conf/samlextConfig.xml. (For example, this path could be C:\Program Files\Apache Group\Tomcat 4.1\webapps\samlext\conf\samlextConfig.xml.) If you did not specify any key pairs during the installation, the configuration file should look like the one shown in Figure 74:
Figure 74SAMLextConfig.xml File

Modify the signature keypair element with usage signing to include the file name and password of the PKCS#12. In the example, the file would be modified to read as shown in Figure 75:
Figure 75Modified Signature KeyPair Element

This example assumes that the exported PKCS#12 file was copied to the SAML extension server as c:\mysig_keypair.pfx, using novell as the password.
Modifying the SAML Settings in the Directory
Although you have created and imported the key pair, it is only used if it is required by the SAML configuration stored in the directory. The signing of SAML data is a setting made on a per-affiliate basis. This means that the SAML administrator can decide which SAML partner sites receive signed data and which do not. The following steps show how signing is turned on for the eMartian affiliate:
-
In ConsoleOne, select the Trusted Affiliate object you want to sign data for.
In this example, data that is intended for the eMartian affiliate is signed.
-
Open the Trusted Affiliate object's property page by right-clicking the object and selecting Properties, as shown in Figure 76:
Figure 76
Trusted Affiliate Properties
-
Click the Assertions page.
Figure 77
eMartian Properties: Assertions Page
-
Select Digitally Sign Assertions for the Browser/POST Profile.
This causes the system to use your key pair to sign SAML data sent to the eMartian Trusted Affiliate using the browser/POST file.
-
Click OK.
Continue with Exporting the Public Key Certificate.
Exporting the Public Key Certificate
Now that you are signing the SAML data, you need to provide your SAML partner site with a way of validating the signatures you generate. You do this by providing the partner with your public key certificate which the partner can import into its system and use to validate the signatures you generate.
To export the public key certificate:
-
In ConsoleOne, open the Properties page associated with the key pair you are using to generate your digital signatures (the same as you did when you exported the key pair in PKCS#12 format).
-
Click the Certificates page, then select public key certificate. (This is also the same as you did when you exported the key pair in PKCS#12 format.).
-
Click Export.
The Export Certificates Wizard is displayed:
Figure 78
Export Certificate Wizard
-
Select No. You should only export the public key portion of the pair.
-
Click Next.
-
Select the file name and format to save the file as.
The most common file format is binary DER encoding.
Figure 79
Output Format: Binary DER Format
-
Click Next.
-
Click Finish.
Next, you should send the public key certificate to your partner sites that want signed data. The partner sites would then import the certificate so that they could validate your signatures.
Continue with Importing Public Key Certificates.
Importing Public Key Certificates
This section is presented from the point of view of the SAML administrator of eMartian. At this point you have received a public key certificate from www.ichainsite.com that you can use to validate signatures generated by that site. You must now import this public key certificate into your system and associate it with the Trusted Affiliate object representing www.ichainsite.com. The following steps show how to import a public key certificate into eDirectory and then associate the certificate with the Trusted Affiliate object representing www.ichainsite.com.
In Novell eDirectory, trusted public key certificates must be placed in a Trusted Roots container. If you do not already have one you will need to create this container. Typically, the Trusted Roots container is created under the [ROOT].security container.
-
In ConsoleOne, right-click the security container, then click New > Object.
-
Select NDSPKI:Trusted Root as shown in Figure 80:
Figure 80
NDSPKI Trusted Root
When the Trusted Roots container has been created, you can add a new Trusted Root public key certificate to it.
-
Right-click the Trusted Roots container, then click New > Trusted Root.
Figure 81
New Trusted Root
-
Click OK.
The Create Trusted Root Wizard launches.
-
Specify the NDS Object name for the trusted root. In Figure 82, ichainsite_signature has been entered as the name.
Figure 82
Trusted Root Name
-
Click Finish.
This completes the trusted root import. You should now have a new object in the Trusted Roots container.
Next, you need to associate this object with your Trusted Affiliate entry for www.ichainsite.com.
-
Right-click the iChainSite Trusted Affiliate object, then select Properties.
Figure 83
iChainSite Trusted Affiliate Object Properties
-
Click the General page, then select the plus sign (+) under the SAML Signature section.
-
Browse to the Trusted Roots container and select the desired trusted root object.
Figure 84 shows the www.ichainsite.com Properties page with the trusted root reference set:
Figure 84
iChainSite Properties: Trusted Root Reference Set
Creating this setting allows the SAML system to validate data signed by www.ichainsite.com.
-
Click OK.
-
Verify that signature validation occurs by clicking the Assertions page and selecting the Require Digitally Signed Messages for Browser/POST Profile option, as shown in Figure 85:
Figure 85
iChainSite Properties: Assertions Page
Choosing this setting ensures that all SAML messages sent from www.ichainsite.com to eMartian using the browser/POST profile must be signed and validated or they are not be accepted.
Testing Digital Signatures
After completing the steps in the previous section, SAML data sent from www.ichainsite.com to eMartian using the browser/POST profile is digitally signed. You can validate this by checking the log messages on each SAML extension server. When assertions are generated, you can see the XML signature being generated.
Configuring SAML to Support SSL Mutual Authentication
Use the following procedure to configure the SAML system to support SSL Mutual authentication over the SAML back-channel:
- Generate an SSL key pair (SKP) or import it into the system and store it in eDirectory. See Generating the SSL Key Pair.
- Export the SKP from eDirectory in PKCS#12 format and store it on the SAML extension server. See Exporting the SSL Key.
- Use the SKP as the SSL key pair on the appropriate iChain accelerator. See Importing the SSL Key Into iChain.
- Import the SKP into the SAML extension server. See Importing and Configuring the SAML Extension Server to Use the SSL Certificate.
- Export the public key certificate associated with the SKP and send it to the Trusted Affiliate. See Exporting the iChain Server SSL Public Key Certificate.
- Import the partner's SSL public key certificate (the one it sends to you) into your trust store. See Importing the Partner's SSL Public Key Certificate.
- Configure the appropriate settings on the Trusted Affiliate that will be communicating with your site over SSL-M. See Importing the Partner's SSL Public Key Certificate.
Generating the SSL Key Pair
You can use the Novell Certificate Server snap-ins to generate your SSL key pair. If you choose to do this, the steps required are nearly identical to those followed to generate the data signing key. The only difference is on the Create Server Certificate page, rather than selecting the Signature option as you did when you were generating the signature key pair, you should select the SSL or TLS option as shown in Figure 86:
Figure 86Create Server Certificate (Key Material)

Exporting the SSL Key
The steps for exporting the SSL key are identical to those you used to export the signing key pair. (See Exporting a Signing Key Pair.) Be sure to select the public key certificate page and remember the export password (you will need it when the key pair is imported).
Importing the SSL Key Into iChain
You can use the same key pair for SAML SSL as you do for SSL on your iChain accelerator. If you already have an acceptable certificate in use on the iChain accelerator, you can use the iChain GUI to export it into a PKCS#12 file and then import it into eDirectory. Alternately, you can import a PKCS#12 key pair exported from eDirectory into iChain.
In order to import a PKCS#12 file into iChain, the file must be in 8.3 format (the file must have a maximum of 8 characters in the name, and a 3-character extension).
-
Copy the PKCS#12 file you exported onto a floppy and rename it to fit the 8.3 format.
-
Next, open iChain GUI on the iChain server. Select the Certificate Maintenance option, then click the Restore button.
Figure 87
Certificate Maintenance: Restore Certificate
-
Specify the PKCS#12 file name, specify the appropriate password, then select Floppy.
-
Click OK, then click the Apply button on the left side of the GUI. The status and action indicators on the Certificate Maintenance page shows whether the operation was successful.
Next, you need to configure your www.ichainsite.com accelerator to use this certificate for SSL.
-
Click the Configure option, then click the Web Server Accelerator page.
Figure 88
Web Server Accelerator
-
Select the appropriate accelerator, then click the Modify button.
-
Click the Certificate menu, then select the appropriate certificate, then click OK to apply the changes.
Importing and Configuring the SAML Extension Server to Use the SSL Certificate
As you did for the signing key, you must get the PKCS#12 file exported from eDirectory onto the local file system of the SAML extension server. Then you must modify the SAML extension server's configuration file to use it.
To import the Signature Key file into the SAML extension server for use:
-
Copy the PKCS#12 file exported in the previous process to the local drive of the SAML extension server.
-
Modify the SAML extension server configuration file to point to this file.
When you installed the SAML extension software, a configuration file was automatically generated. This file is located at SAMLEXT_HOME/config/samlextConfig.xml. After modifying this file to handle the signing key, it should look similar to Figure 89:
Figure 89
Modifying the samlextConfig.xml File
-
Modify the signature keypair element with ssl usage to include the filename and password of the SSL key pair PKCS#12. As shown in Figure 90, you would modify this file to read as:
Figure 90
Modifying the Signature KeyPair Element with SSL Usage
This assumes that you copied the exported PKCS#12 file to the SAML extension server as c:\myssl_keypair.pfx using novell as the password.
Exporting the iChain Server SSL Public Key Certificate
In order for your partners to accept SSL connections from you, they must have and trust the public key associated with your SSL key pair. You must export the public key certificate and send it to your partners so that they can create this trust relationship.
The easiest way to get the SSL Public Key for the iChainSite is to do the following:
-
Connect to the iChainSite accelerator using Internet Explorer.
-
Double-click the lock in the lower right corner, then click the Certification Path page.
-
Select the CA (the top item).
-
Click View Certificate, then click the Details page.
-
Select Copy to File.
-
Select Base-64, then click Next.
-
Name the file ichainsite.b64, then save it.
Importing the Partner's SSL Public Key Certificate
In order to create mutually authenticated SSL connections, the following two conditions must be in place:
- Your partners must validate and trust your server certificate.
- You must trust your partners' server certificates.
Thus, just as you sent your SAML partner site your SSL public key certificate, you must receive from your SAML partner sites their SSL public key certificates and import them into your system's trust store.
It is assumed that your partner site, eMartian, has generated an SSL key pair and sent you (iChainSite) its SSL public key certificate.
-
Connect to the eMartian site accelerator using Internet Explorer.
-
Double-click the lock in the lower right-hand corner, then click the Certification Path page.
-
Select the CA (the top item).
-
Click View Certificate, then click the Details page.
-
Select Copy to File.
-
Select Base-64, then click Next.
-
Name the file eMartian.b64, then save it.
You import eMartian's SSL certificate into your Trusted Root container and associate it with the eMartian Trusted Affiliate object.
NOTE: Each iChainServiceObject can associate with a Trusted Root container. You must verify that the SSL trusted roots that you use are imported into this container. Otherwise, SSL connections do not work through iChain. The Trusted Root container associated with the iChainServiceObject can be determined by opening the iChainServiceObject's Properties page and selecting the General page, as shown in Figure 91:
Figure 91iChainServiceObject Properties Page

If you haven't set the the value, you can set it by selecting the Browse button on the right. If no Trusted Root container has been created, follow the steps outlined in Importing Public Key Certificates to create one.
After setting this Trusted Root container name attribute in the iChainServiceObject, browse to the container and import the eMartian.b64 certificate. The certificate can be imported by following the steps outlined in Importing Public Key Certificates.
After importing the certificate into the appropriate Trusted Root container, you must configure the SAML extension server to use it. In this example, you are administering iChainSite and are receiving a certificate from eMartian, so you would select the Trusted Affiliate object associated with eMartian as shown in Figure 92:
Figure 92eMartian Trusted Affiliate Object

To configure the SAML extension server to use the certificate:
-
Right-click the object, then select Properties.
-
Select the General page, then click the plus sign (+) associated with the Secure SAML Communication group.
-
Select the SSL certificate associated with this Trusted Affiliate. In this example, the certificate is the eMartian SSL public key certificate, as shown in Figure 93:
Figure 93
eMartian SSL Public Key Certificate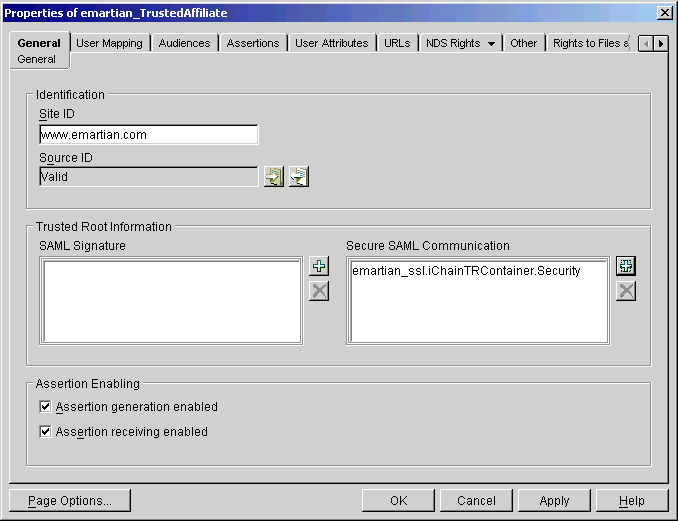
-
Click OK.
-
Go to the eMartian site and import the ichainsite.b64 you saved earlier.
Modifying the SAML SOAP Endpoint URL
After you are set up for SSL, you can modify the SOAP endpoint associated with the eMartian affiliate to make use of this new security. There are two separate ways of accessing the SAML back-channel:
- Through the /cmd/ext URL switch. This extension can handle clear text and server side SSL. :
- Through the /cmd/mutExt URL switch. This runs only SSL-M. If you modify the SOAP endpoint of the eMartian site to include the /cmd/mutExt switch rather than the /cmd/ext switch, SSL-M is used. This setting is made at the URLs page. Figure 94 shows this setting.
Modifying the SOAP Endpoint for eMartian

The SOAP Responder URL now contains /cmd/mutExt rather than /cmd/ext. You can require that affiliates communicating with you over the SAML back-channel use SSL-M. This setting is made on the Assertions page. Figure 95 shows this setting:
Figure 95eMartian Properties: Require Client Authentication

With the Require Client Authentication for Secure SAML Communication setting enabled, only connections with SSL-M with a certificate matching that are in the Secure SAML Communication field are accepted.