
Administrator's Guide
CHAPTER 4
This chapter describes how the Novell exteNd Application Server accesses and uses relational databases and Enterprise Information Systems (EIS) located on the data tier. It also describes how to set up access to these data sources. Topics include:
This section describes the different ways the application server uses databases and other components stored on the data tier:
The application server uses a master database catalog, called SilverMaster, for overall system management. The SilverMaster database is created and automatically added to the server during server installation. SilverMaster can be any supported database type that supports autoincrementing columns.
 For the complete list of supported database types, see the Release Notes.
The SilverMaster database provides these system management functions:
The SilverMaster catalog contains internal tables that the application server uses for system management. These tables are reserved for application server use. For a list of these tables, see Appendix C, "System Tables and URLs".
Default SilverMaster permissions After a default installation, users have Read access to the top level of the SilverMaster database and directories. This enables users to log in and access any existing deployment databases.
Users cannot add or remove any databases or access any deployed JARs until you grant them permission. If you have configured separate ports for different types of operations, you must use your administration port to update database configuration.
 For information about troubleshooting the SilverMaster database, see Using the SilverMasterInit program.
Moving the SilverMaster database If you move your SilverMaster database from the host it was initially installed on, the application server needs to know the new connection location. The easiest way to update SilverMaster's connection location information is to rerun the server's installation program after moving the SilverMaster database.
NOTE: Some databases require you to update connection parameters (for example, by using ODBC, JDBC, or Oracle TNS).
In the server's installation program, specify the moved SilverMaster database as you respond to the prompts. Be sure to choose the option Install a new Server configuration file from the screen that runs SilverMasterInit. It is not necessary to run SilverMasterInit.
If you run SilverMasterInit to initialize the SilverMaster properties, you will have to recreate any Silver Security users and groups, and manually add your deployment databases. As always, it is a good idea to test the connection to SilverMaster (using another application) before restarting the application server.
J2EE applications are stored in archive files. The application server deploys J2EE archives to SilverMaster or a relational database that has been added to the application server. You add a database to the application server using the SMC or SilverCmd as described in Configuring deployment databases.
You can only add database types that are supported by the application server. For the complete list of supported databases, see the Release Notes.
What happens when you add a database to the server When you add a database to the server, an entry is made in SilverMaster so that the application server knows how to connect to and use the database—and system tables are added to the database too. The system tables are ordinary database tables, but they are reserved for application server use. The server stores the archives and any associated metadata in these system tables.
You can deploy an application to an already existing database (that contains corporate data) or you can add a database created as a target for application deployment.
NOTE: When adding a deployment database on a UNIX platform, you must add the location of the database to the AGCLASSPATH environment variable, then restart the server before you can add the database. For information about AGCLASSPATH, see Setting the AGCLASSPATH variable.
Adding databases in a restricted environment If your application server is running in a restricted production environment, you will need to authenticate yourself before adding (or deleting) a database. In a restricted environment, no users (except the server administrator) can add databases unless you grant them permission.
Accessing data The application server accesses corporate data via a connection pool, and not as an added database. If you deploy your J2EE archives to databases that also contain corporate that you want to access, you must create a connection pool for the database.
 For more information on adding connection pools, see Configuring connection pools.
Choosing a deployment database You can deploy your J2EE applications to any supported relational database or to the SilverMaster database. The following table describes some of the reasons for choosing SilverMaster or another deployment database:
J2EE applications (such as WARs, EARs, and EJB JARs) define the data sources they access as resource references in the deployment descriptor. When the archive is deployed to the server, the deployer uses deployment tools to map the resource reference to data sources available to the server.
As administrator you are responsible for making sure that the data source is available to the server and that the server has the appropriate permissions to the data source. You make a data source available to a J2EE application by creating a connection pool. You can create a connection pool using the SMC or SilverCmd as described in Configuring connection pools.
The application server can access relational databases through a native JDBC driver or through a JDBC-ODBC bridge driver.
JDBC is a standard application program interface (API) for allowing Java applications such as the application server to enable SQL access to relational databases. The application makes JDBC calls to the JDBC driver, which translates the calls to the API of the underlying database. The Java runtime system supplies an ODBC bridge driver that allows JDBC to connect to supported databases through an ODBC driver.
There are four types of JDBC drivers:
The following diagram shows the components of each supported JDBC driver type:
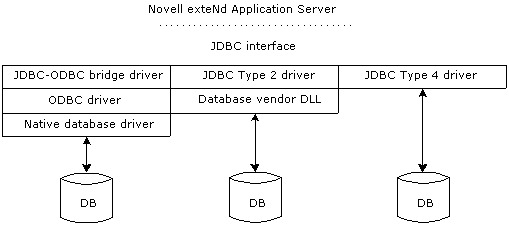
To access a database via JDBC, the application server must be able to find the JAR files for the appropriate JDBC driver. That means those JARs must be added to the server's classpath. How this is done depends on the kind of database access you are setting up:
This section presents general guidelines for these setup tasks. To get the details for your DBMS, see the corresponding database configuration chapter in the application server's Database Configuration Guide.
For SilverMaster When you're setting up access to the SilverMaster database, adding JDBC driver JARs to the application server's classpath involves the following:
For any other database access When you're setting up any other database access (other than for SilverMaster) and a different database driver is involved, you must manually add those JDBC driver JAR files to the application server's classpath. This might occur if, for instance, you're accessing DB2 for SilverMaster but also need to establish connection pools for Oracle.
The typical way to do this is:
As you set up database access for the application server, it's recommended that you first test each connection using the tools provided by your database vendor. Knowing that those connections are valid can save time later if you need to troubleshoot access from the application server.
You can use a relational database as a deployment repository for your J2EE archives or as the application server's SilverMaster. The database you use can contain existing data or can be created only for deployment. This section describes how to make a deployment database available to the server and includes these topics:
 For information on setting up a deployment database, see the chapter for your DBMS in the Database Configuration Guide.
The following table describes in general what you need to do so that you can use a database with the application server:
|
Task |
Description |
|---|---|
|
Set up a database user account for the application server |
Use a DBMS utility for adding and modifying database account permissions (such as Sybase Central, Microsoft Enterprise Manager, Oracle Server Manager, Informix Control Center, and so on). The application server needs a database account to use when connecting to each database. The user account (such as Agsmith) must have CREATE TABLE, INSERT, UPDATE, and DELETE permissions. You should set up a separate account for your SilverMaster and one for each deployment database so you can easily tell how the database is being used. This strategy will help you more easily identify and troubleshoot performance problems.
|
|
Set up an ODBC data source for the database |
ODBC control panel (Windows only; ODBC connections are currently not supported on UNIX). |
|
Configure the DBMS client software on the application server machine |
Use native database software (such as Oracle SQL-Net, Microsoft SQL Server client, Informix CLI, and so on). |
|
Install the JDBC driver |
Use native DBMS installer to install a JDBC driver on the application server machine (for example, jConnect). |
 For information about how to set up a specific database type for use as SilverMaster or as a deployment database, see the appropriate configuration chapter in the Database Configuration Guide.
NOTE: You cannot name the database SilverStream.
Before you can deploy a J2EE archive to the server, you need to add the target deployment database (unless you are deploying to SilverMaster).
 To add a database to the application server:
Select the server in the left pane of the SMC. If the server is not listed, add it to the SMC, as described in Administering an application server remotely.
Use the table below to enter the information for the database. If you need help, see the chapter for your DBMS in the Database Configuration Guide.
|
Field |
What to specify |
|---|---|
|
Name of the database |
Enter the name of the database. For an ODBC database, the database name must be an already existing ODBC data source name. |
|
User name and password |
Enter a user name and password pair that the application server can use for a database user connection to your native database. These values cannot be null. This user name must already be known to the native database and have the appropriate read/write permissions. NOTE: Your administrator should have defined a unique user for each deployment database. |
|
Database platform |
Choose from the list of supported database platforms. |
|
Driver set |
Choose a driver set from the list. Driver sets are specific to the database platform you selected. The driver set recommended for your database type is displayed by default. Some driver sets require you to specify additional parameters. If you select one of these driver sets (a driver set whose name does not begin with Novell exteNd), see Using another company's driver set. |
|
Store system tables separately from data tables |
If you plan to use a production database that other applications access, you may not want to add the application server's system tables to it. The system tables are used by the application server. This option allows you to store the application server's system tables in another database. If you check this option and click Next, a panel displays asking you to name the system table database. (This database must already exist.) |
|
Include only a subset of tables |
You may not want to use all the tables in the database you are adding. By selecting this option, you can specify a subset of tables to make available on the server. If you select this option and click Next, a panel displays with two list boxes. In the top box you can manually name each table you want to use. In the lower box you can specify patterns to indicate sets of tables; for example, you could specify cust% to use all tables starting with cust. |
Using another company's driver set If you are not using an application server–supplied driver set, you must supply additional information:
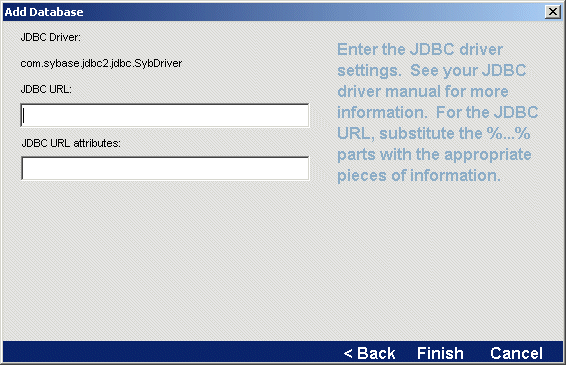
The following table describes each of the fields on this panel:
 For more details, see your JDBC driver documentation.
What happens When you add a database, the server adds an entry in the SilverMaster database and also adds the application server's system tables to your database (unless you specified to keep system tables separate, in which case the system tables are added to the other database).
Adding a database from the command line You can also add a database to the server from the command line or from a batch file using the AddDatabase SilverCmd.
Deploying a J2EE application When you are ready to deploy your J2EE application, see the chapter on J2EE archive deployment in the Facilities Guide.
If you have moved a database that you had added to the application server, remove the database from the server and then re-add it to the server.
If you are using ODBC, you may also need to update the database's ODBC settings.
If you are using a JDBC driver (such as jConnect), you will have to update the JDBC URL when adding the database back to the server.
If you don't need to maintain a connection between a database and the application server, you can remove the database from the server.
 To remove a database from the server:
Select the server in the left pane of the SMC. If the server is not listed, add it to the SMC, as described in Administering an application server remotely.
What happens When you remove a database connection from the server, the application server removes the entry from SilverMaster but leaves the database itself fully intact (including the application server's system tables).
Removing a database from the command line You can also remove a database from the server from the command line or from a batch file using the RemoveDatabase SilverCmd.
You can use the SMC to configure databases that have been added to a server. For example, you can use the SMC to synchronize database information and delete idle connections. If you have configured separate ports for different types of operations, you must use your administration port to update database configuration.
NOTE: If you have configured separate ports for different types of users and operations, you must specify your administration port to start the SMC.
Enter information for the database as follows:
|
Field |
Description |
|---|---|
|
User Name and Password |
A user name and password pair, which the application server can use for a database user connection to your database. The user name must already be known to the database and have the appropriate Read/Write permissions. |
|
Minimum Connections |
The minimum number of server connections for this database. |
|
Maximum Connections |
The maximum number of server connections for this database. |
|
Remove database |
A button that removes the selected database from the server. See Removing a deployment database from the server |
|
Synchronize Database Schema |
A button that lets you synchronize the application server's image of the database with any changes to the database structure. The application server keeps its own image of the database schema. When you modify the database's structure, click this button to update the server's image of it.
|
|
Delete Idle Connections |
A button that releases database connections that are not currently being used. When the server needs more connections, the connection pool will automatically regrow as needed to the maximum number of connections defined. Deleting idle connections allows you to (at least temporarily) free up some database connections for use by other applications without having to restart the server.
|
|
System Database Properties |
A button that displays only if the selected database is storing its application server system tables in another database (you specify this property when adding a database to a server). Click this button to see information about the database that stores the application server's system tables for the selected database.
|
Synchronizing the database schema You may need to synchronize the server metadata and the current database schema to ensure that tables, views, and key definitions cached on the server match the current database structure. This is not checked by default. Use the -dbcheck command-line option to force this check to occur.
NOTE: You can also use the -noexitondbcheck command-line option to see any errors while still starting the server. If you see any errors, you should synchronize the database. For more information, see Database not synchronized.
When it receives a request to synchronize the database, the server:
You make corporate data in relational database or EIS systems available to the application server via connection pools. This section describes how to create and maintain connection pools. It includes these sections:
Before you create a connection pool, make sure you've performed the administrative tasks outlined in the following table:
The application server uses connection pools to provide access to corporate data in relational databases (via JDBC) or one or more EIS (via a RAR deployed to the server).
This section describes how to add JDBC connection pools using the SMC's Add JDBC Connection Pool Wizard. When you create a JDBC connection pool, you must have a JDBC driver installed on your system; the application server supports both JDBC 1.0 and JDBC 2.0 drivers.
This section provides the following topics:
From the command line You can also add a JDBC connection from the command line. See Adding a connection pool from the command line.
The wizard panels and the order in which they are presented vary depending on the type of JDBC driver you are using to access the database. This table shows how you step through the wizard based on the type of JDBC connection pool you want the wizard to build. You can click the links to get more information about the values you must supply for each panel.
|
If you want to create a JDBC connection pool |
You'll be responsible for |
|---|---|
|
For JDBC drivers that are preconfigured for exteNd * |
|
|
For JDBC 1.0 user-defined drivers |
|
|
For JDBC 2.0 user-defined drivers |
* A preconfigured driver is a driver for which the application server provides a higher level of service. For preconfigured drivers, the application server knows how to handle error codes returned by the driver and can also work around bugs in the driver.
 To start the Add JDBC Connection Pool Wizard:
Select the server in the left pane of the SMC. If the server is not listed, add it to the SMC, as described in Administering an application server remotely.
 For more information about how to continue, see Panel sequence.
This section contains reference information for these tasks:
This panel is used to specify whether you are using a preconfigured or user-defined driver.
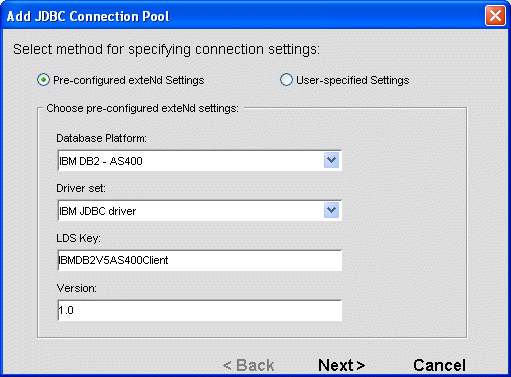
Complete the panel as follows:
If you chose Pre-configured exteNd settings, complete the remaining fields as follows:
This panel is used to specify the name of the pool and the username/password combination the server will use to connect to the target database:
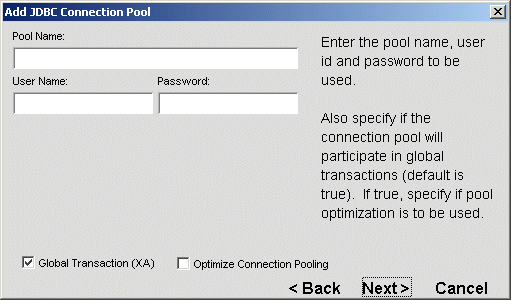
Complete the panel as follows:
This panel lets you specify information about the JDBC driver you are supplying:
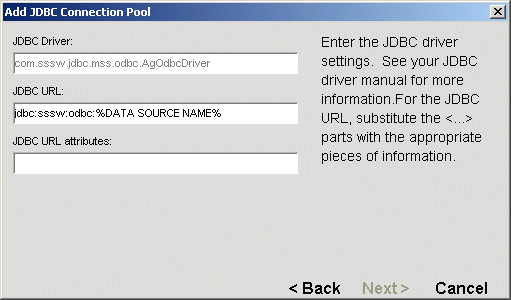
Complete the panel as follows:
This panel lets you provide any additional properties for the connection pool your JDBC driver can support:
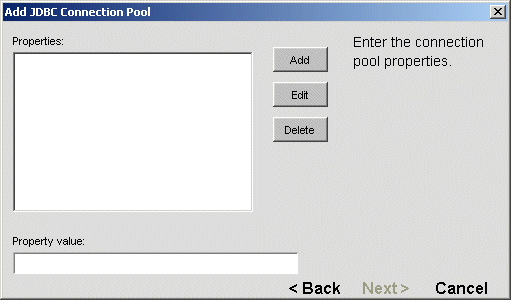
To supply the properties, choose Add and then use the following table to complete the panel:
|
Field |
What to specify |
|---|---|
|
Property Name |
Name of the ManagedConnectionFactory property |
|
Property value |
Value of the ManagedConnectionFactory property |
NOTE: These values are determined by the driver you are using. For more information on these properties, see the vendor's documentation.
This panel lets you specify connection and timeout values for the connection pool:
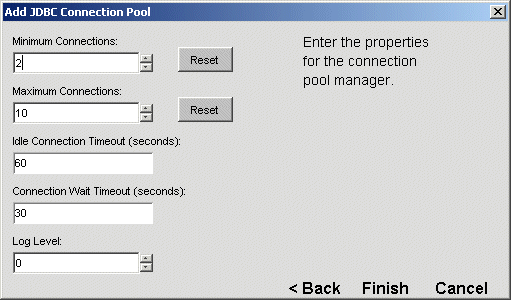
Complete the panel as follows:
This panel lets you specify the version for your JDBC driver:
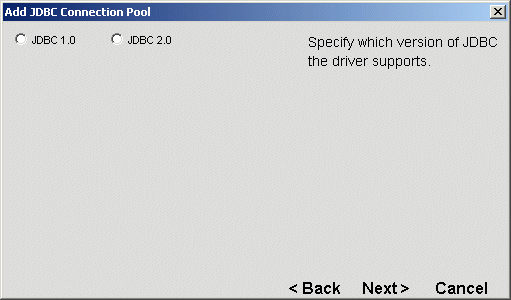
Complete the panel as follows:
|
Field |
What to specify |
|---|---|
|
JDBC 1.0 |
Choose this option if your JDBC driver supports JDBC 1.0 |
|
JDBC 2.0 |
Choose this option if your JDBC driver supports JDBC 2.0 |
This panel lets you specify the datasource class name and or connection pool class name for JDBC 2.0 drivers:
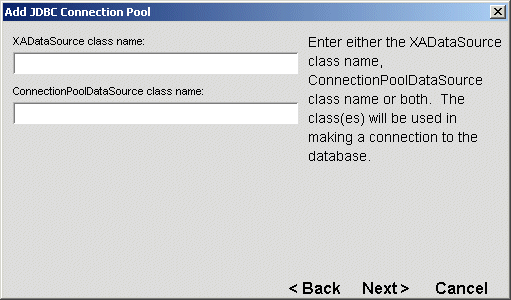
Use the following table to complete the panel (you must enter a value for at least one of the fields):
Even if you specify both the ConnectionPoolDataSource and XADataSource class names, only one is used. Which one that is depends on the overall configuration properties you specified in the panel described in Specifying data source configuration properties. The configuration properties are then applied to the instance of the data source class.
When you add a connection pool, the application server creates the connection to the database with the user name you specified and preallocates the minimum number of connections you specified.
You can also add a connection pool from the command line or from a batch file using the AddCP SilverCmd.
When you create a Connector connection pool, you must have a RAR deployed and enabled on the server. For more information on deploying a RAR, see J2EE Archive Deployment in the Facilities Guide.
This section describes how to add connection pools using the SMC's Add Connector Connection Pool Wizard.
 To add a Connector connection pool:
Select the server in the left pane of the SMC. If the server is not listed, add it to the SMC, as described in Administering an application server remotely.
Select Connector and click Add. You are prompted to specify the name of the pool and the username/password combination the server will use to connect to the target database:
Provide the connection pool information as follows:
You are prompted to enter vendor-specific properties the pool should support:
Complete the panel as follows:
|
Field |
What to specify |
|---|---|
|
Property Name |
Name of the ManagedConnectionFactory property |
|
Property Value |
Value of the ManagedConnectionFactory property |
You are prompted to enter information about the pool connections and connection timeout values:
Complete the panel as follows:
What happens When you add a connection pool, the application server creates the connection to the EIS with the user name you specified and preallocates the minimum number of connections that you specified.
Adding a connection pool does not require you to restart the server—unless you remove a connection pool and then add a pool (of the same type) with the same name. If the original connection pool (the one that was removed) was used by a running application, it is possible that one of the active components, such as an EJB object in the pool, has cached a reference to a java.sql.DataSource object. This reference might refer to the invalid connection pool. Restarting the server will clear the cached references.
Adding a connection pool from the command line You can also add a connection pool from the command line or from a batch file using the AddCP SilverCmd.
If you don't need to maintain a connection between a database or EIS and the application server, you can remove the connection pool from the server.
 To remove a connection pool from the server:
Select the server in the left pane of the SMC. If the server is not listed, add it to the SMC, as described in Administering an application server remotely.
Removing a connection pool from the command line You can also remove a database from the server from the command line or from a batch file using the RemoveCP SilverCmd.
You can edit a subset of connection pool properties, shut down a pool, and restart a pool.
 To edit connection pool properties:
Select the server in the left pane of the SMC. If the server is not listed, add it to the SMC, as described in Administering an application server remotely.
The Edit Connection Pool Wizard displays. You can change different properties of the connection pool depending on its type. For information about the JDBC connection pool panels, see Panel reference; for information about the connector connection pool panels, see Adding a Connector connection pool.
Click Next to navigate the Edit Connection Pool Wizard to modify the properties.
Click Finish to complete the wizard. You do not need to restart the connection pool or the server for the changes to take effect.
When you shut down a connection pool, it is not available to service client connection requests.
You may want to shut down a connection pool when the underlying database or EIS is temporarily brought offline—because it guarantees that the pool will not service user connection requests.
When you shut down a connection pool, all database connections are closed and all resources associated with the connections are freed. Use Restart (described below) to make the connection pool available again. Restarting the server will not restart a shut down connection pool.
Select the server in the left pane of the SMC. If the server is not listed, add it to the SMC, as described in Administering an application server remotely.
Recognizing an invalid connection pool If a pool name displays in bold, that means it is invalid. A pool might be invalid if the connection pool failed to start at server initialization time. This may happen when the database is down or if some network problem occurs and connections cannot be created. To remove any invalid pools, see Removing a connection pool next.
You can restart a connection pool that was stopped by the Shutdown button of the SMC.
The pool is restarted using the configuration properties (such as minimum/maximum connections, timeouts, and so on) used by the pool before it was shut down.
Select the server in the left pane of the SMC. If the server is not listed, add it to the SMC, as described in Administering an application server remotely.
This section describes other considerations that apply in creating and managing connection pools and includes these topics:
The application server reclaims connections used by application components in different ways depending on the type of component (stateful or stateless):
For stateless components, like servlets and stateless session beans, the application server reclaims connections after the method invocation
For stateful components, like stateful session beans, the application server will not reclaim a connection as long as the bean is actively used by a client
You can configure how the application server reclaims connections opened by stateless components using the http-server.com.sssw.srv.invctx.releaseRes property in the httpd.props file. The property has these values:
You should use JDBC drivers and resource adapters that provide JTA/XA support—especially with applications and components that perform transactional processing.
When you create connection pools for JDBC drivers that do not support the JTA/XA protocol or Connector resource adapters that support only local transactions, the application server enables connections created by these pools to participate in global transactions—but only one such connection can participate in a transaction. By default, the application server attempts to share the connections obtained in the scope of the transaction (unless specified by the deployment descriptor). This means that:
If the component attempts to obtain more than one unshared connection from the pool, the pool manager will throw an exception when the second connection request is made
If one or more components involved in the same transaction attempt to obtain two connections from the pool using different security credentials (such as user names and passwords), the connection pool throws an exception when the second request is made
Work performed using these types of connections is not recoverable.
JDBC and Connector-based connection pools by default are configured to enlist connections in global transactions. You can create a connection pool whose connections are not enlisted in a global transaction when the transaction:
Do not configure J2EE applications or standalone components to use connection pools configured in this manner. They will violate the application's or component's transactional semantics.
Use container managed sign-on when possible. Applications that use component managed sign-on are less portable and less efficient.
Copyright © 2004 Novell, Inc. All rights reserved. Copyright © 1997, 1998, 1999, 2000, 2001, 2002, 2003 SilverStream Software, LLC. All rights reserved. more ...